Franklin Sensors ProSensor M150 review
Nine sensors and fifteen LEDs instead of one sensor and a beep. You put it flat on the wall, press, and the stud lights up — including where its edges are and where its center is.
Top pick
Franklin Sensors ProSensor M150 9-Sensor Stud Finder
Nine sensors and fifteen LEDs read the wall in one placement and light up over the whole stud, so you see its full width immediately. No calibration, no sweeping, no second guess.
#ad we may earn a commission · price as of November 13, 2026
Scored 9.5 · Finding the stud first time. The full ranking and the runners-up are below.
Quick picks
Our ranking at a glance. Tap any row for the full write-up, or the price to go straight to Amazon. Scores are ours, weighing published specs, the design and what owners report after a year — the method is published in full.
| # | Product | Best for | Score | Price |
|---|---|---|---|---|
| 1 | 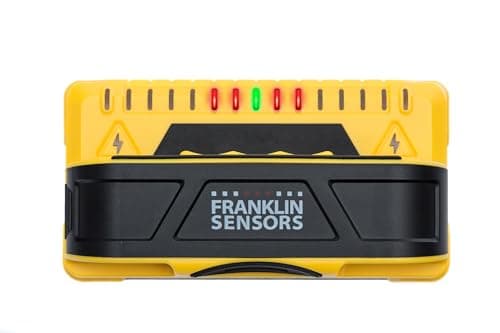 Franklin Sensors ProSensor M150 9-Sensor Stud Finder Finding the stud first time | Finding the stud first time | 9.59.5 out of 10 on our Beginner-friendly, Value, Durability, Stores small scoring |
#ad — Amazon links on this page are affiliate links. How this site is funded.
This is our top pick in the stud finder roundup, and the case for it is narrower than the marketing: it is not more sensitive than a cheap stud finder, and it does not see deeper. It removes the procedure. A single-sensor finder has to be calibrated on blank wall, swept slowly until it beeps, marked, swept from the other direction until it beeps again, and marked again — and if you got the calibration spot wrong, every result after it is wrong too. The M150 you place flat on the wall and press. Nine sensors read at once and the LEDs light up over the stud.
That is the whole product. Whether it is worth roughly double a basic finder depends entirely on what you are hanging, and we will be specific about that below.
As with everything on this site, this is an assessment built from the published specification, the design, and consistent owner-reported experience over time. See how we pick.
The specification, and what each number means in use
| Spec | Figure | What it means when you are holding it |
|---|---|---|
| Sensors | 9 | The wall under the tool is read in one placement. No sweeping, and no calibration step to get wrong. |
| LEDs | 15 | The lit band shows you the stud's full width, so you can see a double stud or an odd framing layout rather than inferring it. |
| Center indicator | Middle LED turns green | You do not have to find two edges and do the arithmetic. The tool tells you where to put the screw. |
| Detection depth | 1.5 in maximum | Fine through standard half-inch or five-eighths drywall. Not enough for thick plaster and lath. |
| Live wire warning | Yes | Warns of AC cable near the surface before you drill. It is a warning, not a guarantee. |
| Power | 2 AAA batteries | Common cells, available anywhere. Franklin specifies against rechargeables. |
| Made in | USA | Unusual in this category, where almost everything is a rebadged generic. |
One listing detail worth knowing so you are not confused when the box arrives: this tool is sold as the ProSensor M150 and also as the X990 depending on the retail channel, and the Amazon listing names both. It is the same tool.
Edges and center, which is the thing people actually need
The reason this matters is not accuracy for its own sake. It is that a stud is only about 1.5 inches wide, and a screw placed near its edge grips maybe half the timber it should. That fixing will hold a picture indefinitely and will let go of a 55-inch television about four months later, which is how televisions end up on floors.
A single-sensor finder gives you one beep at a time and you build the picture yourself: sweep right until it beeps, mark; sweep left until it beeps, mark; measure the middle. Three chances to be slightly off, and no way to tell a single stud from two studs nailed together next to a doorway.
The M150 lights a band of LEDs across whatever is behind it and turns the middle one green. You see the width and the center in the same instant, which means you also see the two situations that catch people out: a double stud (common beside doors, windows and at wall ends, and the lit band is obviously twice as wide), and an irregular layout where the framing is not on the 16-inch centers you assumed. Neither is visible on a beeper.
If you are mounting a TV, this is the feature you are buying, and the TV mounting tool list explains why both bracket bolts need to be centered rather than merely somewhere in the timber.
The live-wire warning, and what it does not promise
The M150 warns of live AC cable near the wall surface. That is genuinely valuable — drilling into a cable is the one household mistake that can hurt you rather than just cost you — and it is also the feature most likely to be over-trusted, so here is the honest framing.
It detects the electromagnetic field of a live conductor. That means it can miss a cable that is not energized, a cable inside metal conduit, a cable running deeper than the detection range, and anything that is not AC at all: no stud finder in this price class finds water pipes, gas lines or dead wiring. It is a reason to be careful in a spot it flags, not a license to drill confidently everywhere it stays quiet.
Two habits are worth more than the feature. First, assume there is cable running vertically above and below every switch and outlet, and do not drill in those columns. Second, if you are drilling in a kitchen or bathroom wall where plumbing is likely, use a finder with a dedicated metal mode — the Povlen in our roundup has one, and the M150 does not. More of this in home safety essentials.
Where it struggles
Five real limitations, none of them hidden, all of them worth knowing first.
- It has to sit flat. Nine sensors across a wide body only help if all nine are against the wall. Heavily textured plaster, popcorn or knockdown finishes, and tile with proud grout lines all lift part of the tool away and degrade the reading. Taping a sheet of thin card to the wall under the tool is the standard workaround and it does help.
- 1.5 inches is the depth limit. Standard drywall is half an inch, so there is plenty of margin for normal construction. Double-drywall walls and old plaster-and-lath can exceed it, and then you are guessing. That is the case for Franklin’s 13-sensor M210 instead, which is the deeper tool in the same family.
- No depth readout and no modes. It tells you where the stud is, not how far back. There is no metal mode, no pipe mode, no screen. For this reader that is mostly a virtue — a mode you have to select is a mode you can select wrongly — but if you want depth figures, this is not the tool.
- Two AAA cells, and no rechargeables. Franklin specifies against rechargeable batteries in this tool, which is a slightly annoying constraint in a household that has standardized on them. The practical upshot is to keep a pair of alkaline AAAs in the tool box with it, because a stud finder is used twice a year and flat batteries in a once-a-year tool are close to a law of nature. Weak cells on a sensing tool do not simply fail — they can read inconsistently first, which is the worse failure mode, so if two placements eight inches apart disagree, change the batteries before you blame the wall.
- It is bulky to store and it is not cheap. It will not live in a jacket pocket the way a $15 finder will, and it is roughly double the price. In a small apartment with one drawer of tools that counts against it; see tool storage.
How to use it properly
- Hold it flat against the wall with your palm over the body — not gripped at one end, which tilts it — and press.
- Read the lit band. Mark a pencil line at each outer lit LED and at the green center. Three marks, five seconds.
- Move about eight inches down the wall and do it again. The two readings should agree. A stud is vertical and continuous, so if the second reading disagrees with the first, one of them found something that is not a stud — a pipe, a duct, a cable run or a horizontal fire block.
- Before drilling anything heavy, confirm with physics: tap the wall between your marks and over them. Over a stud it sounds solid rather than hollow. Agreement between the tool and the tap is about as certain as you can get without opening the wall.
Then drill into the green mark, not between it and an edge. The full hanging method, including which anchor to use when there is no stud where you need one, is in how to hang things without damaging walls.
Is it worth double the price of a $15 finder?
Here is the honest arithmetic, because “buy the better one” is not an argument.
The thing you are buying insurance against is a heavy object coming off a wall, and the cost of that is not the drywall repair — it is the television, the mirror or the shelf of plates that fell. One failed TV mount costs several hundred dollars and possibly your deposit. Against that, the difference between a $15 finder and a $40 one is not really a purchase decision; it is a rounding error with a safety margin attached.
But the opposite is also true, and most pages will not say it: if the heaviest thing you will ever hang is a framed print and a curtain rail, a $15 finder with LED arrows does that perfectly well, and the extra twenty-five dollars is better spent on a ratcheting screwdriver. Buy by what you are hanging.
| What you are hanging | Buy | Why |
|---|---|---|
| A TV, a heavy mirror, a loaded shelf, a wall-mounted desk | ProSensor M150 | You need the stud's full width and its center, and you need to be right the first time. |
| Pictures, a curtain rail, light shelving | DEWALT LED-arrow finder | Roughly the right spot is good enough, and it fits a pocket for about fifteen dollars. |
| Anything in an old house with plaster-and-lath walls | ProSensor M210 | Thirteen sensors and more depth than the M150's 1.5 in limit. |
| Drilling a kitchen or bathroom wall | A finder with a metal mode | The M150 has no pipe detection. Copper behind tile is the mistake you cannot undo. |
The verdict
Buy it if you are mounting anything whose falling would be a disaster, if you have standard drywall, and if you would rather own one tool that is right first time than save twenty-five dollars and develop a technique. It earns its place in a first-home kit on the strength of a single successful TV mount.
Do not buy it for textured or plaster walls, for depth readings, for finding pipes, or because it is the most expensive one — and do not buy it at all if the heaviest thing on your walls is a calendar. It sits alongside a drill, a tape measure and a ratcheting screwdriver in the new-homeowner tool kit, and the full first-home list is in the tool kit you actually need.
The short version
- Nine sensors and fifteen LEDs read the wall in one placement — the value is removing the sweep-and-calibrate routine, not extra sensitivity.
- The lit band shows the stud's full width and the middle LED goes green at its center, so double studs and odd framing are visible.
- The 1.5 in detection depth covers standard drywall but not plaster-and-lath; that is the M210's job.
- The live-wire warning finds energized AC near the surface only. It does not find pipes, conduit or dead cable.
- If the heaviest thing you hang is a picture, a $15 LED-arrow finder is genuinely enough.
The picks in detail
#ad we may earn a commission · price as of November 13, 2026
#1 · Finding the stud first time
Franklin Sensors ProSensor M150 9-Sensor Stud Finder
Nine sensors and fifteen LEDs read the wall in one placement and light up over the whole stud, so you see its full width immediately. No calibration, no sweeping, no second guess.
- Beginner-friendly
- 9.7
- Value
- 9.1
- Durability
- 9.6
- Stores small
- 9.2
What we like
- Dramatically more reliable than single-sensor finders, which is the whole point
- Shows stud width, so you can center a screw properly
- Live-wire warning before you drill into a cable
Good to know
Twice the price of a basic finder
Specifications
- 9 sensors and 15 LEDs read the wall in a single placement — no sweeping
- Shows both stud edges at once — no edge-finding routine
- AC live-wire warning
- No calibration step; place it flat and press
Who it is for
Anyone hanging a TV, heavy shelf or mirror. Getting this wrong costs more than the tool.
Our recommendation
If you read nothing else on this page, this is the short version.
Buy this one
Franklin Sensors ProSensor M150 9-Sensor Stud Finder
Anyone hanging a TV, heavy shelf or mirror. Getting this wrong costs more than the tool.
#ad we may earn a commission · price as of November 13, 2026
Common questions
Is the Franklin ProSensor M150 worth it?
For anything heavy, yes. Nine sensors and fifteen LEDs show the stud’s full width and mark its center in one placement, with no calibration step to get wrong, and at around forty dollars it costs a fraction of the television a badly placed mount drops. If you only hang pictures, a fifteen-dollar LED-arrow finder does that job properly and the M150 is more tool than you need.
Does the ProSensor M150 show stud edges and the center?
Yes — that is the point of it. The LEDs light across the full width of whatever is behind the tool, so you read both edges at once, and the middle LED turns green to indicate the stud’s center. You never have to find two edges separately and calculate the middle, and a double stud is immediately obvious because the lit band is twice as wide.
How deep does the Franklin M150 detect?
Franklin specifies a maximum detection depth of 1.5 inches. That is comfortable for standard half-inch or five-eighths-inch drywall. Double drywall and old plaster-and-lath can exceed it, and for those walls Franklin’s 13-sensor ProSensor M210 is the correct tool.
Does the M150 detect electrical wires and pipes?
It has a live AC wire warning, which detects energized cable near the wall surface. It does not detect water pipes, gas lines, cable inside metal conduit, or wiring that is not energized. If you are drilling a kitchen or bathroom wall, use a scanner with a dedicated metal mode as well.
Does the ProSensor M150 need calibration?
No. Franklin states that no calibration is required — you place it flat on the wall and press. Removing that step is most of why it reads correctly more often than a single-sensor finder, because a miscalibrated finder gives confident wrong answers.
Will a stud finder work on plaster or textured walls?
Less reliably. A multi-sensor finder needs all its sensors flat against the surface, so heavy texture, popcorn finishes and proud tile grout lift part of the tool and degrade the reading. Taping thin card to the wall under the tool helps. For genuine plaster-and-lath, buy the deeper-scanning M210 instead.
Sources
Read next
- Best stud finders for home useAll four finders ranked, including the cheap one that is enough for pictures.
- How to hang things without damaging wallsWhat to do once you have found the stud — and what to do when there is not one.
- Tools to mount a TV on the wallThe job this tool exists for, start to finish.
- Best tool kits for new homeownersThe kit this sits alongside. No kit at any price includes a stud finder.
- Home safety essentialsBreaker labeling, and the walls you should not drill into at all.